Wednesday, December 19, 2012

What's in my Quick n Brite? Quick n Brite Ingredients

In 2009, Seattle Times writer Erik Lacitis wrote a piece on Quick n Brite salespeople and the trade of being a "pitch man." (You can see the article here). In his article he called on professor Jeff Harwell, of the University of Oklahoma's School of Chemical, Biological and Materials Engineering, and an expert on cleaning formulations, to dissect the list of ingredients on our Quick 'n Brite container and explain what they actually do. Mr. Harwell did a fantastic job of thoroughly explaining the ingredients in terms everyone can understand! Harwell says, "It's a good formulation, a state of the art formulation," and states the ingredients have been around for a long time. Quick n Brite is non-toxic, biodegradable and contains no know carcinogens or harmful chemicals. Here is Mr. Harwell's explanation:

Biodegradable nonionic nonyl-phenoxy-polyethoxy-ethanol: "Common chemical called surfactant. Used in everything from toothpaste to dish-washing liquid. This particular surfactant has been around for 50 years and is generally considered to be both harmless and biodegradable. There has been some controversy in Europe about some of its biodegradation by-products having estrogen-mimicking properties, but research has not generally borne out those concerns. Surfactants help the cleaning solution wet oily surfaces, reduce the amount of force that you have to apply to detach the dirt from the surface being cleaned, and help keep the dirt suspended until it can be rinsed away. Surfactants are the main active ingredient in most cleaners, whether you're talking about laundry detergent, toothpaste, shampoo, and hand soap."

Sodium EDTA: "We call this a sequestering agent. It is a water-soluble salt that makes hard water act like soft water by complexing with the water hardness ions. It's kind of like having a built-in water softener in the product. Very safe material that is found in products like cosmetics and soft drinks and is used in foods as a preservative. This makes the surfactants work better."

Sodium tripolyphosphate: "Same function as the sodium EDTA, but having both is generally synergistic. Again a very safe compound used with products like seafood to prevent them from drying during storage and shipping. But again, the main purpose is to make the surfactants work better."

Water: "No comment necessary, I assume."

Pure natural coconut oil surfactant: "Probably a surfactant like sodium lauryl sulfate, which is made from coconut alcohol. Very common in toothpaste, laxatives, pharmaceutical formulations, cosmetics, hand and body soaps, etc. This is one of the oldest surfactants known and is accepted as generally safe. Many studies of the toxicity have shown no ill effects. This type of surfactant is also a salt and is classified as an anionic surfactant. The first surfactant listed, the nonionic nonyl-phenoxy-polyethoxy-ethanol, is classified as a nonionic surfactant. We generally find that mixtures of anionic and nonionic surfactants, such as you have here, give better cleaning results. They also allow the same cleaning system to work in over a wider range of cleaning temperatures, from cold water to hot water."

Natural kelp alginate: "A natural biopolymer that is used just as a thickener. If you've ever had a milkshake from a fast-food restaurant you've probably had some of this. It also helps keep small particles from being redeposited on a surface. It would be classified as an anti-redeposition agent. Bottom line is that it keeps the surface from becoming recontaminated from the wash solution!"

Dye: "Primarily just for aesthetic purposes, but actually helpful in giving you visual clues about how much dilution has occurred and whether there is any of the cleaning compound left on a surface after rinsing. Provides a good visual clue for when you're done rinsing."

We love being able to offer a cleaning product to families that we know is safe and works well. Quick n Brite has been family owned and operated since 1952 with the same non-toxic and biodegradable ingredients. Quick n Brite has also been backed with a 100% money back guarantee for over 60 years! 

Friday, November 30, 2012

How to Clean a Retainer | Cleaning Tips to Prevent Bad Breath

Yes, you read that right, you can use Quick n Brite to clean your retainer! The formula is non-toxic and safe, and does a great job of removing tea and coffee stains or white deposits from retainers.

 Retainers are a word that instantly makes teens cringe and parents check their pocket books. However, for many people braces are a necessity and wearing a retainer afterwards is just a way of life. Retainers take on a lot of accidental abuse; everyone has fished at least one retainer out of the garbage can, and in worst case scenarios, even out of the toilet. If your retainer finds itself in a germy situation, disinfecting and cleaning your retainer is a must to keep a healthy, happy mouth. Your retainer should also be thoroughly cleaned weekly to prevent bad breath, gum disease and other negative side effects.

Regular Maintenance 

Your retainer can be cleaned with a soft bristled toothbrush and toothpaste and should ideally be cleaned every time you brush your teeth. Just put a dab of toothpaste on your retainer and use your toothbrush to scrub the retainer, then rinse with warm water. 

Deep Cleaning & Disinfecting

Even with regular maintenance your retainer is constantly exposed to food particles, germs in your saliva and other airborne particulates that enter your mouth. Overtime, many retainers are stained from coffee, or get white deposits that are hard to get off. To prevent these things from building up and staining it is a good idea to deep clean your retainer when you start to notice even a build-up or "bad" taste. It is never a good idea to boil your retainer in water, although that will kill bacteria, it can also melt the plastic and cause your retainer to fit incorrectly. It is also not a good idea to soak your retainer in mouthwash, as the alcohol in mouthwashes can cause the retainer to crack or break, the same goes for using denture cleaner on a retainer, it is much too harsh for the brittle plastic. Instead, use Quick n Brite to deep clean your retainer, the formula is non-toxic and contains no harmful chemicals, yet will remove tea and coffee stains and other build-up from your retainers without having to worry about harming them or ingesting chemicals.

Start by mixing 1 teaspoon of Quick n Brite liquid to 1 cup of hot water. Let the retainer soak in the solution for 15 minutes, then use a toothbrush to quickly scrub the retainer. Rinse thoroughly with hot water and your retainer will be clean and rid of germs. This quick step can help prolong the life of your retainer and prevent any germ build-up which can cause illnesses. 

Monday, November 26, 2012

Cyber Monday Specials

www.quicknbrite.com   |   p: 425-778-8285   |   p: 800-223-9187

twitterFacebook
 

 Take Advantage our Cyber Monday Sales!

   
Free Shipping

Cyber Monday Special

TODAY ONLY: Receive Free Shipping on ALL orders placed before midnight (CT)!

SHOP NOW

Use Coupon Code: MONDAY at check-out
To place an order over the phone please call: 425-778-8285 and mention the Cyber Monday Special. Office hours are from 8 am- 4 pm PST, if after office hours order must be placed online to receive the discount. 
 

Free 12 oz paste

Cyber Monday Special

TODAY ONLY: Receive a FREE 12 oz paste with any order over $50.00 placed before midnight! 

SHOP NOW

 Use Coupon Code: CYBER at check-out (Discount will appear as $0.01 savings)
To place an order over the phone please call: 425-778-8285 and mention the Cyber Monday Special. Office hours are from 8 am- 4 pm PST, if after office hours order must be placed online to receive the discount.

 Check out our Quick n Brite Blog for Easy Cleaning Tips and Directions


How to Clean Your Oven the Natural Way Without Harsh Chemicals

Even if you have a self cleaning oven, the self cleaning cycle can take hours and fill your home with a thick cloud of black, smelly smoke, not to mention the energy the cleaning cycle consumes. Whether you have a quick "spill-over" to clean up, or months of baked on food Quick n Brite can tackle any size job without using chemicals. READ MORE


Fireplace Brick Cleaning

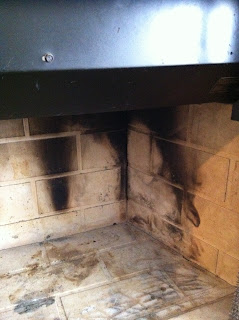
How to Clean Fireplace Soot from Stone, Brick and Glass

We received this great customer video showing how to clean your fireplace screen that has soot and creosote build up using Quick n Brite READ MORE
 
How to Clean a Fish Tank


How to Clean a Fish Tank using Quick n Brite

Cleaning a fish tank is an easy process if you have the right products and you know what to do. If you maintain your fish tank cleaning on a regular basis the process is much easier and is less upsetting to the fishes habitat; but if you need to do a deep clean or are starting fresh with a new fish tank Quick n Brite makes cleaning your fish tank much easier! READ MORE

Monday, November 19, 2012

How to Clean Your Oven the Natural Way Without Harsh Chemicals

With Thanksgiving and the holidays right around the corner, many of us are finding ourselves on a cleaning spree around the house to get ready for family, friends and entertaining this holiday season. I was recently helping a friend get her home ready for the holidays and after the kitchen was spotless, I reminded her that her 15 pound turkey she bought had to be cooked somewhere! Upon opening her oven, it appeared that one too many casseroles and cherry pies had overflowed onto the bottom of her oven with no regards to ever wiping them up. Needless to say, it was a perfect job for Quick n Brite and with that, I decided to share how easy cleaning your ovens without any harmful chemical sprays can be.  
Original Photo Source
Even if you have a self cleaning oven, the self cleaning cycle can take hours and fill your home with a thick cloud of black, smelly smoke, not to mention the energy the cleaning cycle consumes. Whether you have a quick "spill-over" to clean up, or months of baked on food Quick n Brite can tackle any size job without using chemicals. 
Original Photo Source
First, apply Quick n Brite full strength using a wet scrub sponge or brush. Much like cleaning your fireplace (see directions here), it is easiest if you split the oven into sections and clean small areas at a time. You do not have to scrub, here is the trick: After the Quick n Brite is applied onto your oven, shut the door and turn your oven on low for 10-15 minutes. Turn off the oven and allow time for it to cool, then using a damp terry cloth towel simply wipe out the remaining residue in your oven. You will not need any elbow grease or masks for the noxious fumes! With Quick n Brite, cleaning your oven is an easy and approachable job! 

Wishing you and your family a Happy Holiday Season, feel free to like us on Facebook for cleaning tips so you can spend more time with your family this winter, and less time cleaning the house! 

Wednesday, October 10, 2012

How to Clean Fireplace Soot from Stone, Brick and Glass

We've published a blog post with directions "How to Clean Your Fireplace" before, but just received this great customer video showing how to clean your fireplace screen that has soot and creosote build up using Quick n Brite and thought we'd touch on the topic again. With fall and winter bringing colder temperatures many people are preparing to use their fireplaces and getting them clean before the season is great to prevent any dangers.  

In the video they use the heavy solution of Quick n Brite to spray the clean the soot and creosote build up on the fireplace screen, but we'll include a few more directions if you'd like to clean your entire fireplace.

Materials Needed:

  1. Quick n Brite Paste (About 3-5 ounces)
  2. Stiff Nylon Brush or Sponge
  3. 1 gallon bucket or bowl of HOT water
  4. Dust Pan and brush/Shop Vac or Household Vacuum with hand held attachment
  5. Spray Bottle to mix Quick n Brite heavy solution cleaner in, and/or for water to rinse fireplace bricks
  6. Towels to cover surrounding fireplace area to avoid drips of soot 
  7. Rubber Gloves (optional) *Quick n Brite is non-toxic and safe and will not harm your skin*
fireplace cleaning products
First, begin by removing as much ash and soot as possible using a dust pan and brush or vacuum. PLEASE make sure that there are no ashes or hot embers in the fireplace before beginning this project. Discard of ashes in a yard waste bin. 

Next, using a damp terry cloth towel wipe the fireplace brick and glass clean to remove as much loose soot as possible. This will make the next steps much easier and less of a mess. If the soot and creosote build-up on your fireplace is bad, use your spray bottle of Quick n Brite heavy solution to spray down the entire fireplace enclosure. While the product is sitting, the unique formulation of Quick n Brite is actually breaking down the build-up on your fireplace and doing the scrubbing for you.


Then, get your sponge or brush wet using the hot water and then apply Quick n Brite full strength to the fireplace brick, stone and glass in small 5 to 6 inch circular motions. It is easiest to section the fireplace off into grids and focus on cleaning one section of the fireplace first instead of trying to clean the entire area. It will result in a lot less scrubbing! For stubborn areas, let the product sit about 10 minutes instead of using elbow grease. Quick n Brite will break down soot and creosote while it is sitting on your fireplace surface. Use your bucket of hot water to rinse the brush out during the process.
how to clean fireplace soot from brick

After letting the product sit for 10 minutes, use a damp terry cloth towel  to wipe away the soot and Quick n Brite. Once the majority of the fireplace surface is clean, use a spray bottle of hot water to rinse off the fireplace surface, glass and stone as the last step.

Quick n Brite is non-toxic, biodegradable and safe for you and your family. There are no toxic chemicals or fumes.

To Clean your Fireplace, we recommend:

Quick n Brite; Natural Cleaning Products; Shower Cleaner; Fireplace Cleaner; Green Cleaner; Household Cleaning Products;
OR you can order a 12 oz or 30 oz paste by calling: 1-800-223-9187

Friday, September 21, 2012

Easy Steps on How to Clean Paint Brushes using Quick n Brite

Your paint brushes are an investment, whether you are an artist with expensive brushes or a home owner painting your bedroom or house, cleaning your brushes properly and thoroughly after painting will make your brushes last longer and is worth the investment of time. Quick 'n Brite is safe on synthetic brushes or natural brushes and the few minutes you spend cleaning your brushes after using them will extend their use. Unlike dish soap, Quick n Brite will not gunk up on your bristles or leave a residue.

One thing many painters do with outdoor brushes is use the pressure of a garden hose to force out paint, many people even turn the brush upside down and let the water stream jet into the bristles. This is one of the fastest ways to ruin a paint brush. Instead, with just a bit of patience you can properly clean your brushes so they will last for many uses.
Photo Credit

To Clean your Paint Brushes: 

1. First, gently wipe off any excess paint using a cloth or soft tissue. You can use your fingers to squeeze out excess paint starting at the base of the brush and moving towards the bristles, but don't pull to hard on the actual bristles.

2. If you are using a water-based paint use luke-warm water to rinse the bristles out. Avoid using hot water or leaving the brushes soaking in water as that will cause the glue to loosen and hairs to fall out.
   *DO NOT turn the brush upside down and let the water shoot straight into the tips of the bristles! This will cause stress on the bristles and quickly wear out the brush.
  * DO NOT push the bristles so they bend at a 90 degree angle.
If you are using an oil based medium rinse the brush in turpentine or oil. Then gently wipe the brush off again to remove leftover paint.

3. Then place a small dab of Quick n Brite in a dish (if you are using solvent based paints or toxic pigments) or in the palm of your hand if your paints are safe and gently work the cleaner into the brush.

Photo Credit
4. Rinse brush again with luke-warm water and repeat the process until the water runs clear from your brush. Do not use high water pressure to force the paint from the brush, it causes stress on the bristles just be patient and repeat steps 3 and 4 multiple times.
Photo Credit
5. Once your brush is completely clean, gently shape the brush head using your fingers into its correct shape and lay flat or hang the brush to dry. Do not dry the brush resting on the bristles.


Monday, August 27, 2012

How to Clean the Rubber Roof on your Motorhome

As any motorhome owner knows, cleaning and maintaining your RV is a time consuming job. However, with proper maintenance and care the time you put into maintaining your RV now can save you thousands of dollars down the road. Whether you choose to resale your RV, or keep it indefinitely, taking good care of your RV is an investment in time and energy that is worth it.

One area many RV owners neglect to maintain unless it is leaking is the rubber roof of the motorhome. Whether the roof is leaking or not, it needs to be inspected and cleaned annually, at the very least. RV roofs are made out of Ethylene Propylene Diene Monomer, or EPDM a material designed to last up to 20 years on motorhome roofs and with proper care and inspection, a tear in the roof membrane or seal can be caught before the problem becomes a leak and inflicts costly damage.

Another great benefit of cleaning the RV roof is to prevent the white stains that drip down the side of your RV and prevent the chalky build-up on the roof. The chalky surface that forms on the roof is normal from use, but if it isn't properly cleaned and maintained can lead to white chalk stains and a roof that will need to be replaced before it's time.


Cleaning the rubber roof is actually an easier chore than cleaning the exterior of the RV but many people clean them both at the same time.

To begin the project, mix 1 cup of Quick n Brite to 5 gallons of water. Using extreme caution, you will need to get the cleaning solution, a large broom or brush and a garden hose onto the roof of your RV. I also always bring the concentrated Quick n Brite and a sponge for areas with mildew build-up (especially around the seals and vents). Hose off the RV roof to remove any large debris and dirt then scrub the roof with your brush using the cleaning solution. Quick n Brite works better on stubborn areas if it is left to sit for 10-15 minutes, so you don't need to rinse the roof off immediately. Usually by the time you get to the back of the RV 10-15 minutes have elapsed then you can rinse the roof with your garden hose. After the roof has been rinsed off if there are areas of bad mold or mildew build-up that still remain, apply the Quick n Brite concentrate full strength using a scrub sponge to these areas then hose them off. Once you are finished with the roof you can use the same application of the diluted Quick n Brite solution to clean the fiberglass siding, windows, tires and wheels. If you have stubborn areas like black streaks or love bugs on your windshield and grill, you may have to use your Quick n Brite paste full strength with your scrub sponge. Quick n Brite is safe on anything water can touch and will not harm any of your exterior RV surfaces.

Once you are done, stand back and take a look at the great job you have done! Spend a few hours a year maintaining the rubber roof on your RV and your investment of time is guaranteed to pay off in the future.

Wednesday, June 27, 2012

How to Clean your Deck and Patios

Cleaning your deck and patio is a great way to get your house ready for the summer months. Here in the Pacific Northwest, after a wet winter and fall, decks are often covered with moss and other debris when the spring and summer months roll around. Depending on your climate, you may not need to clean your decks and patios as often as we do here in Washington State. But no matter what the climate and conditions, weathering will have an effect on your deck over a prolonged period of time. 
Clean boat docks with Quick n Brite
One great thing about cleaning your deck and patio with Quick n Brite is the cleaning solution is non-toxic and biodegradable, so it is safe for any type of decking (wood, composite, concrete, stamped concrete etc.), safe for you, your pets and your plants or landscaping. You do not have to worry about keeping animals away while you are cleaning, or killing your plants and lawn.
Clean concrete with Quick n Brite
(If you are going to use a pressure washer to clean your deck or patio, make sure to read the manufactures information to prevent damage to your deck or patio from the water pressure)

To begin the deck cleaning process take your garden hose and spray your deck down. This will help remove large debris and will also help the cleaner spread evenly. Next, a trick of the trade to mix your Quick n Brite solution: Mix it into a clean bug sprayer! Add 2/3 cup of Quick n Brite Liquid to 1 gallon of HOT water. (Hot works better to dilute the cleaner, and is also more effective to clean.) If hot water is not easily accessible, water from your garden hose will work fine as well. 
How to clean concrete using Quick n Brite
Once your heavy solution is mixed, generously spray your deck or patio with the Quick n Brite heavy solution. If your deck is in desperate need of cleaning, let the solution sit for 10-15 minutes before beginning the next step. With Quick n Brite, the longer the solution sits on the surface the better it is going to work and the less scrubbing you have. After 10-15 minutes use a push broom or stiff brush to brush the surface of the deck. If you have leftover heavy solution, you can dunk your broom into the cleaner to get more cleaning solution onto the deck, or you can mix and additional gallon of heavy solution. Again, let this sit for 10-15 minutes then use your garden hose to rinse off the deck or patio. 

Cleaning Tip: Use the same technique to clean your house siding! Works great at removing red clay, dirt, moss and dust.
Clean house siding with Quick n Brite

Thursday, May 31, 2012

How to Clean a Fish Tank using Quick n Brite


Cleaning a fish tank is an easy process if you have the right products and you know what to do. If you maintain your fish tank cleaning on a regular basis the process is much easier and is less upsetting to the fishes habitat; but if you need to do a deep clean or are starting fresh with a new fish tank Quick n Brite makes cleaning your fish tank much easier!


New Fish Tanks, Decorations and Plants:

Sometimes when you purchase a new fish tank it needs to be rinsed out with more than just warm water. Use the Quick n Brite light solution (1 tsp to a quart of water) to give the new fish tank a good cleaning. Quick n Brite is non-toxic and biodegradable so it is safe for your new fish!

Large Fish Tanks:

For regular maintenance to your fish tank: 

Start by cleaning the inside of the glass using an algae pad. (Don't use a regular sponge from the store, there can be too many harsh chemicals or detergents in the scrubber). If you come across a stubborn patch you can use a razor blade to scrape off the excess algae. (Be careful!) You can also clean your blade ahead of time with Quick n Brite to remove any grease or residue. If your tank is acrylic make sure and use a plastic blade.

Remove the plants, decorations etc:

After speaking with fish tank experts many professionals recommend a deep cleaning of rocks or decorations on a cycle so you don't remove too much good bacteria from the tank. (Example: Clean half the plants on week one and the other half of your plants on week three). This is where Quick n Brite is especially good to clean the plants and decorations as well as remove harmful bacteria. Soak your plants or decorations in the Quick n Brite light solution (1/8 cup of Quick n Brite to 1 gallon of hot water or 1 teaspoon of Quick n Brite per quart) for 15 minutes. If there is a large build up of algae you can also use your algae pad to help remove build up. After all the algae is removed using Quick n Brite and your algae pad rinse the plants and decorations in warm water.

Siphon the rocks or gravel using a water siphon vacuum:

There are many different types of siphons available on the market to clean rocks and vacuum away debris. We would recommend contacting your local pet store for pros and cons on siphons.

Clean the outside glass: 

After a thorough cleaning of your fish tank, chances are you've dripped some water down the tanks and throughout your house! Use your Quick n Brite light solution (1 teaspoon of Quick n Brite per quart) to clean the outside of the tank, counters and kitchen sink. If you have any trouble with streaking on the outside of the fish tank, just add more water to your Quick n Brite solution!)


Small Fish Tanks: 

Many of the above directions still apply but if you don't have a siphon to vacuum the rocks and they need to be cleaned you can rinse the rocks in the Quick n Brite light solution (1 tsp to a quart of water or 1/8 cup of Quick n Brite to 1 gallon of hot water). Simply soak the rocks in the light solution for 15 minutes then rinse them clean before returning them to the tank.

Product we recommend:

Our 64 oz Quick n Brite Liquid Concentrate is perfect for the job. Quick n Brite is non-toxic and biodegradable so it is safe for your pets and yourself. Since Quick n Brite is an all purpose cleaner it is also great to clean your pet cages or pet stains on carpets! See more Cleaning Tips using Quick n Brite.

64 oz. Liquid - Click Image to Close


Friday, May 11, 2012

How to Remove Candle Wax using Quick ' n Brite

At one time or another haven't we all blown out a candle and spilled wax, knocked over a candle or left a candle burning too long only to find a buildup of wax on our kitchen counter, wood table or granite countertop. Quick n Brite is an excellent way to remove candle wax on any surface in your home. As long as water can touch the surface, Quick n Brite will safely clean it; so you don't have to worry about getting a specialty cleaner to remove candle wax. 
First thing you should do to remove spilled candle wax on any surface is gently remove as much candle wax as possible using a fork, knife or credit card (depending on the surface). If your candle wax is spilled on carpet, or fabrics like a tablecloth a fork works great, if it is a surface that will easily scratch a credit card or something without serrated edges is your best bet.

Hard Surfaces:

If the candle wax is on a hard surface like your counters, tables, buffets or bookcases most of the wax should be removed with the step above but there will probably be a light film of remaining wax residue. To remove this leftover wax use your Quick n Brite paste full strength with a damp non-abrasive sponge and apply it to the spot. If the wax build up does not come off immediately, let the Quick n Brite sit for a few minutes before wiping the surface clean with a terry cloth towel.
Fabrics, Clothing and Machine Washable Materials:


If the wax has spilled on your clothing, tablecloth, cloth napkin or something that can go through the washing machine there is one more step you need to take to remove the wax from fabrics. As mentioned above first remove as much wax as possible using a fork or non-serrated knife. Depending on the color of the wax and how much residue is left, there are two ways you can go to remove the remaining candle wax. If there is still a large amount of wax left or the wax is a dark color on a light colored fabric use the iron transfer method. If most of the wax was removed skip to step 2.

  1. Iron Transfer Method: First, lightly mist the stain with the Quick n Brite light solution (1 tsp of Quick n Brite to a quart of water). Now place a brown paper bag above and below the stained area. Iron over the top of the stain keeping the iron moving to make sure you don't burn anything. The heat will cause the wax to melt and the paper will absorb the candle wax. Keep ironing over a clean part of the paper bag until the wax has been absorbed. 
  2. For any remaining Candle Wax: Wet the material and apply Quick n Brite paste full strength to the remaining candle wax. Briskly rub the material together until the wax stain is removed. Launder the material as you would normally. 


Carpets and Upholstery (Non-Machine Washable Fabrics)


If you need to remove candle wax from a material that cannot be machine washed like carpets or couches use the iron transfer method. First, remove as much wax as possible using a fork, comb or non-serrated knife. Then apply Quick n Brite paste full strength to the area using your fingers or a damp terry cloth towel and let it sit a few minutes. Scratch the spot lightly towards the center with a fork or comb and repeat the process until the candle wax lifts. 


If there is still remaining wax (most of the time if the wax is dark in color) use the Iron Transfer Method. (You do not have to wait for the spot to dry). Lay a brown paper bag over the remaining wax stain and iron over the top. Keep the iron moving so you don't burn anything. The heat will cause the wax to melt and the paper will absorb the candle wax. Keep ironing over a clean part of the paper bag until the wax has been fully absorbed. If necessary, apply more Quick n Brite paste to the stain and buff back out with a damp terry cloth towel.


Wednesday, April 18, 2012

Spring Cleaning Tips and Savings of up to 30%

Quick n Brite
 p.800.223.9187    www.quicknbrite.com 

Spring Cleaning Time is Here!

Quick n Brite Household Cleaner
 To make your spring cleaning job easier we think more is better and free is the best! That's why we made a great spring special kit! When you buy 2 of our 64 ounce liquids you save $5 instantly, plus we also include a FREE 12 oz paste and FREE 18" sponge that you can cut into 5 pieces! 
Retail:
 $63.85
       Your Price: $44.90       You Save: 30% Off!
Order your Spring Special Cleaning Kit now and Save $18.95!
This kit won't be around for long so hurry and take advantage of our great spring special.


Although spring cleaning is not always everyones favorite time of the year, you must admit that when it is done it is a great feeling! Walking into a sparkling clean house and a freshly manicured yard is very rewarding and stress relieving! We are here to make your spring cleaning "job" less of a "job."  

5 "Spring Cleaning" tips

Steam Cleaning the Carpets: If you are really in the mood for spring cleaning, a deep cleaning of your carpets makes a huge visible impact and helps get rid of germs and pet dander in the carpets creating a healthier environment.  
For carpets and upholstery mix 1 cup Quick n Brite liquid to 5 gallons of water in self contained units, orSteam Cleaning Carpets 2/3 cup to 1 gallon for units that attach to the faucet. Do not add a defoamer or spot remover. For bad stains, apply Quick n Brite paste full strength or spray heavysolution on stains and let sit for a few minutes allowing Quick n Brite to go deep down into the stain. Then begin your steam cleaning or shampoo process following machine instructions. WHEN CLEANING CARPETS, FOLLOW MANUFACTURER'S SPECIFICATIONS. SPOT CHECK FOR COLOR-FAST FIRST. 


Cleaning Fireplace BrickClean your Fireplace Brick: For some people cleaning soot and creosote from your fireplace brick and glass is a chore, if you have Quick n Brite, this job is a breeze!
Apply QB paste or liquid full strength with a very wet stiff brush, or a wet scrub sponge on glass. Work in a slow circular motion. Spray with clear water to rinse and wipe with a terry cloth. Quick n Brite will remove smoke, soot, creosote and pitch. For extremely bad areas, repeat the process, if necessary.


Outdoor Windows
Outdoor Windows: Throw away the old squeegee, don't worry about towels to dry the windows and put away the gloves. You can clean your outdoor windows in half the amount of time and effort with Quick n Brite. Choose a cool morning when the sunlight isn't directly on your windows.
Using a garden hose, wet your outdoor windows. Apply Quick n Brite heavy solution with a wet sponge or pole brush then simply hose your windows off. Water will sheet dry from windows with no streaking, no squeegee and no drying.


Leather Couch CleaningClean your couch cushions: This is one of those jobs that you rarely think about doing, but once it's done, you can notice a huge difference! If you have removable fabric on the cushions of your couch you can wash them in the washing machine using a 1/4 cup of Quick n Brite. If the fabric is not removable follow the directions below.
Apply Quick n Brite heavy solution using a terry cloth in a slow circular motion, giving cleaner time to emulsify dirt and grime. If you have a hand held steam cleaning machine, run the Quick n Brite heavy solution through the machine then wipe dry with a clean terry cloth. D0 NOT USE 0N RAW LEATHER OR SUEDE. AS WITH ANY FABRIC, ALWAYS TEST FOR COLOR-FAST AND FOLLOW MANUFACTURER'S SPECIFICATIONS.

House SidingCleaning your house siding: This is another great project to tackle when the weather is nice in the springtime and really helps prolong the life of your siding. Quick n Brite is safe on any siding surface such as vinyl, wood, brick, stucco, or stone and will safely and quickly remove moss, weathering, dirt and build up.
Using a garden hose wet the surface of your house and apply Quick n Brite heavy solution with a brush or scrub sponge. For a heavy build-up, let it sit for about 5 minutes, brush, and hose off.
See more Cleaning Tips and Videos

Monday, April 9, 2012

How to Clean your Outdoor Windows with Quick n Brite

Cleaning your outdoor windows can be a very difficult and time consuming job for many people if you have high windows or water spots from sprinklers and rain. However, using Quick 'n Brite, we make this difficult and tedious process a breeze!
It is best to clean your windows on a cool day or when the sun is not shining directly onto the windows. To clean your outdoor windows with Quick 'n Brite first wet the windows using a garden hose or bucket of water. Apply the Quick 'n Brite heavy solution (2/3 cup of Quick n Brite to 1 gallon of water) with a wet sponge or scrub brush. If you have bad water spots or build up, let the product sit on your windows for 15 minutes. Then use your garden hose and rinse the windows clean. The water will sheet off with no wiping, squeegeeing or hand drying making this an easy and fast process. Another great benefit of Quick 'n Brite is it is it is non-toxic and biodegradable so you don't have to worry about rinsing the cleaner into your flower beds, on your lawn or harming the siding and painting on your house. As long as water can touch it, Quick 'n Brite can clean it!

For your windows, we recommend our 1 gallon of Quick 'n Brite Liquid. The liquid solution is easy to dilute making cleaning your outdoor windows a breeze and 1 gallon of Quick 'n Brite Liquid will dilute to make over 24 gallons of heavy cleaning solution making this a very cost effective value! Try it now!
Quick 'n Brite 1 gallon Liquid

Monday, March 5, 2012

How to Remove Gum from Hair

Believe it or not, Quick 'n Brite does a fantastic job of removing gum from hair! The formula is non-toxic and biodegradable so it is completely safe to use on your skin and hair. 

1. First, remove as much gum as possible that will easily come out.
2. Place ice cubes on either side of the gum, freezing the gum.
3. Pick out as much of the frozen chunks of gum as possible.
4. If there is still remaining gum, use a small amount of Quick 'n Brite paste and apply it to the hair and around the gum itself. Then let it sit for about 10 minutes.
5. Using a comb, comb out the remaining amount of gum. If it does not easily come out, rinse the hair and apply more Quick 'n Brite repeating Step 4.

If you have Quick 'n Brite at home, we recommend using the Quick 'n Brite paste. If you do not own our products, you can purchase them online at www.quicknbrite.com or by phone at 425-778-8285.

We recommend our 80 oz paste. Quick 'n Brite is an all- purpose environmentally safe cleaner that can also be used to remove clothing stains, carpet stains, hard water and more! Try it Now!

If you are looking for a smaller quantity to try first, call our offices at 425-778-8285. Quick 'n Brite is also available by phone in a 12 oz and 30 oz quantity.

Monday, January 16, 2012

How to Remove Candle Wax from Carpets, Clothing, Upholstery and Hard Surfaces

Let's face it, at one point in time most of us have spilled candle wax on carpets, counters, clothing, hardwood floors or more. Depending on the size of the spill, color of the wax and what surface it has been spilled on, removing candle wax can be quite the difficult chore! We will cover a few common areas candle wax is spilled for this post and show you the easiest and fastest ways to clean them with Quick 'n Brite.
HOW TO REMOVE CANDLE WAX ON CARPETS AND FABRICS
Candle Wax on carpets, clothing and upholstery is probably the most difficult area to clean and there are 2 methods to cleaning candle wax depending on how much is spilled and the color of the wax.

1. First, apply Quick 'n Brite paste full strength using a wet terry cloth towel to the spot and rub back and forth in short 5 to 6 inch strokes. 

2. Let the Quick 'n Brite sit for 10 minutes if it is not instantly removed. 

3. Using a fork, knife or comb scratch the spot lightly towards the center removing as much wax residue as possible. 

4. Using a dry terry cloth towel, buff out the remaining stain. 

5. At this point, if there is still a stained area repeat the process once more. If you are not successful in removing all the wax stains, go onto Step 6.

For most people, the stain will be lifted after steps 1-5, if there is a large amount of wax or the wax is a dark color like red or blue some people find the iron-transfer method to work best. 

6. Lay a brown paper bag over the remaining wax spot (it will work better if area is still damp from Quick 'n Brite, so don't worry) 

7. Using an iron set on low heat move the iron slowly back and forth over top of the brown paper bag. The heat will cause the wax to melt and the paper bag will absorb the remaining wax. 

8. Keep ironing over a clean piece of bag until the spot has been fully absorbed. 

CANDLE WAX ON COUNTERS, HARDWOODS OR OTHER HARD SURFACES
For the most part, candle wax can be removed easier from hard surfaces as opposed to carpets and fabric. 
1. First, scrape off as much wax as possible being careful not to scratch your surface.

2. Then using a wet non-abrasive sponge apply Quick 'n Brite paste full strength and rub back and forth in a short 5 to 6 inch motion

3. Wipe area clean with a damp terry cloth towel

To Remove Candle Wax we recommend:
Our Super Shot Starter Kit: (Click the link to be directed to the shopping cart)

This Kit includes: (1) 32 oz. Super Shot, (1) 12 oz. paste, (2) 16 oz. custom mixing bottles, (2) triggers and (2) sponges.