Friday, September 21, 2012

Easy Steps on How to Clean Paint Brushes using Quick n Brite

Your paint brushes are an investment, whether you are an artist with expensive brushes or a home owner painting your bedroom or house, cleaning your brushes properly and thoroughly after painting will make your brushes last longer and is worth the investment of time. Quick 'n Brite is safe on synthetic brushes or natural brushes and the few minutes you spend cleaning your brushes after using them will extend their use. Unlike dish soap, Quick n Brite will not gunk up on your bristles or leave a residue.

One thing many painters do with outdoor brushes is use the pressure of a garden hose to force out paint, many people even turn the brush upside down and let the water stream jet into the bristles. This is one of the fastest ways to ruin a paint brush. Instead, with just a bit of patience you can properly clean your brushes so they will last for many uses.
Photo Credit

To Clean your Paint Brushes: 

1. First, gently wipe off any excess paint using a cloth or soft tissue. You can use your fingers to squeeze out excess paint starting at the base of the brush and moving towards the bristles, but don't pull to hard on the actual bristles.

2. If you are using a water-based paint use luke-warm water to rinse the bristles out. Avoid using hot water or leaving the brushes soaking in water as that will cause the glue to loosen and hairs to fall out.
   *DO NOT turn the brush upside down and let the water shoot straight into the tips of the bristles! This will cause stress on the bristles and quickly wear out the brush.
  * DO NOT push the bristles so they bend at a 90 degree angle.
If you are using an oil based medium rinse the brush in turpentine or oil. Then gently wipe the brush off again to remove leftover paint.

3. Then place a small dab of Quick n Brite in a dish (if you are using solvent based paints or toxic pigments) or in the palm of your hand if your paints are safe and gently work the cleaner into the brush.
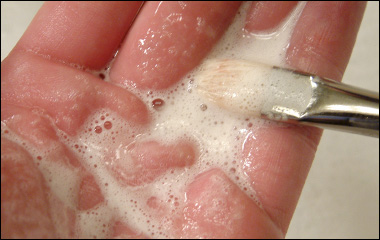
Photo Credit
4. Rinse brush again with luke-warm water and repeat the process until the water runs clear from your brush. Do not use high water pressure to force the paint from the brush, it causes stress on the bristles just be patient and repeat steps 3 and 4 multiple times.
Photo Credit
5. Once your brush is completely clean, gently shape the brush head using your fingers into its correct shape and lay flat or hang the brush to dry. Do not dry the brush resting on the bristles.


Monday, August 27, 2012

How to Clean the Rubber Roof on your Motorhome

As any motorhome owner knows, cleaning and maintaining your RV is a time consuming job. However, with proper maintenance and care the time you put into maintaining your RV now can save you thousands of dollars down the road. Whether you choose to resale your RV, or keep it indefinitely, taking good care of your RV is an investment in time and energy that is worth it.

One area many RV owners neglect to maintain unless it is leaking is the rubber roof of the motorhome. Whether the roof is leaking or not, it needs to be inspected and cleaned annually, at the very least. RV roofs are made out of Ethylene Propylene Diene Monomer, or EPDM a material designed to last up to 20 years on motorhome roofs and with proper care and inspection, a tear in the roof membrane or seal can be caught before the problem becomes a leak and inflicts costly damage.

Another great benefit of cleaning the RV roof is to prevent the white stains that drip down the side of your RV and prevent the chalky build-up on the roof. The chalky surface that forms on the roof is normal from use, but if it isn't properly cleaned and maintained can lead to white chalk stains and a roof that will need to be replaced before it's time.


Cleaning the rubber roof is actually an easier chore than cleaning the exterior of the RV but many people clean them both at the same time.

To begin the project, mix 1 cup of Quick n Brite to 5 gallons of water. Using extreme caution, you will need to get the cleaning solution, a large broom or brush and a garden hose onto the roof of your RV. I also always bring the concentrated Quick n Brite and a sponge for areas with mildew build-up (especially around the seals and vents). Hose off the RV roof to remove any large debris and dirt then scrub the roof with your brush using the cleaning solution. Quick n Brite works better on stubborn areas if it is left to sit for 10-15 minutes, so you don't need to rinse the roof off immediately. Usually by the time you get to the back of the RV 10-15 minutes have elapsed then you can rinse the roof with your garden hose. After the roof has been rinsed off if there are areas of bad mold or mildew build-up that still remain, apply the Quick n Brite concentrate full strength using a scrub sponge to these areas then hose them off. Once you are finished with the roof you can use the same application of the diluted Quick n Brite solution to clean the fiberglass siding, windows, tires and wheels. If you have stubborn areas like black streaks or love bugs on your windshield and grill, you may have to use your Quick n Brite paste full strength with your scrub sponge. Quick n Brite is safe on anything water can touch and will not harm any of your exterior RV surfaces.

Once you are done, stand back and take a look at the great job you have done! Spend a few hours a year maintaining the rubber roof on your RV and your investment of time is guaranteed to pay off in the future.

Wednesday, June 27, 2012

How to Clean your Deck and Patios

Cleaning your deck and patio is a great way to get your house ready for the summer months. Here in the Pacific Northwest, after a wet winter and fall, decks are often covered with moss and other debris when the spring and summer months roll around. Depending on your climate, you may not need to clean your decks and patios as often as we do here in Washington State. But no matter what the climate and conditions, weathering will have an effect on your deck over a prolonged period of time. 
Clean boat docks with Quick n Brite
One great thing about cleaning your deck and patio with Quick n Brite is the cleaning solution is non-toxic and biodegradable, so it is safe for any type of decking (wood, composite, concrete, stamped concrete etc.), safe for you, your pets and your plants or landscaping. You do not have to worry about keeping animals away while you are cleaning, or killing your plants and lawn.
Clean concrete with Quick n Brite
(If you are going to use a pressure washer to clean your deck or patio, make sure to read the manufactures information to prevent damage to your deck or patio from the water pressure)

To begin the deck cleaning process take your garden hose and spray your deck down. This will help remove large debris and will also help the cleaner spread evenly. Next, a trick of the trade to mix your Quick n Brite solution: Mix it into a clean bug sprayer! Add 2/3 cup of Quick n Brite Liquid to 1 gallon of HOT water. (Hot works better to dilute the cleaner, and is also more effective to clean.) If hot water is not easily accessible, water from your garden hose will work fine as well. 
How to clean concrete using Quick n Brite
Once your heavy solution is mixed, generously spray your deck or patio with the Quick n Brite heavy solution. If your deck is in desperate need of cleaning, let the solution sit for 10-15 minutes before beginning the next step. With Quick n Brite, the longer the solution sits on the surface the better it is going to work and the less scrubbing you have. After 10-15 minutes use a push broom or stiff brush to brush the surface of the deck. If you have leftover heavy solution, you can dunk your broom into the cleaner to get more cleaning solution onto the deck, or you can mix and additional gallon of heavy solution. Again, let this sit for 10-15 minutes then use your garden hose to rinse off the deck or patio. 

Cleaning Tip: Use the same technique to clean your house siding! Works great at removing red clay, dirt, moss and dust.
Clean house siding with Quick n Brite

Thursday, May 31, 2012

How to Clean a Fish Tank using Quick n Brite


Cleaning a fish tank is an easy process if you have the right products and you know what to do. If you maintain your fish tank cleaning on a regular basis the process is much easier and is less upsetting to the fishes habitat; but if you need to do a deep clean or are starting fresh with a new fish tank Quick n Brite makes cleaning your fish tank much easier!


New Fish Tanks, Decorations and Plants:

Sometimes when you purchase a new fish tank it needs to be rinsed out with more than just warm water. Use the Quick n Brite light solution (1 tsp to a quart of water) to give the new fish tank a good cleaning. Quick n Brite is non-toxic and biodegradable so it is safe for your new fish!

Large Fish Tanks:

For regular maintenance to your fish tank: 

Start by cleaning the inside of the glass using an algae pad. (Don't use a regular sponge from the store, there can be too many harsh chemicals or detergents in the scrubber). If you come across a stubborn patch you can use a razor blade to scrape off the excess algae. (Be careful!) You can also clean your blade ahead of time with Quick n Brite to remove any grease or residue. If your tank is acrylic make sure and use a plastic blade.

Remove the plants, decorations etc:

After speaking with fish tank experts many professionals recommend a deep cleaning of rocks or decorations on a cycle so you don't remove too much good bacteria from the tank. (Example: Clean half the plants on week one and the other half of your plants on week three). This is where Quick n Brite is especially good to clean the plants and decorations as well as remove harmful bacteria. Soak your plants or decorations in the Quick n Brite light solution (1/8 cup of Quick n Brite to 1 gallon of hot water or 1 teaspoon of Quick n Brite per quart) for 15 minutes. If there is a large build up of algae you can also use your algae pad to help remove build up. After all the algae is removed using Quick n Brite and your algae pad rinse the plants and decorations in warm water.

Siphon the rocks or gravel using a water siphon vacuum:

There are many different types of siphons available on the market to clean rocks and vacuum away debris. We would recommend contacting your local pet store for pros and cons on siphons.

Clean the outside glass: 

After a thorough cleaning of your fish tank, chances are you've dripped some water down the tanks and throughout your house! Use your Quick n Brite light solution (1 teaspoon of Quick n Brite per quart) to clean the outside of the tank, counters and kitchen sink. If you have any trouble with streaking on the outside of the fish tank, just add more water to your Quick n Brite solution!)


Small Fish Tanks: 

Many of the above directions still apply but if you don't have a siphon to vacuum the rocks and they need to be cleaned you can rinse the rocks in the Quick n Brite light solution (1 tsp to a quart of water or 1/8 cup of Quick n Brite to 1 gallon of hot water). Simply soak the rocks in the light solution for 15 minutes then rinse them clean before returning them to the tank.

Product we recommend:

Our 64 oz Quick n Brite Liquid Concentrate is perfect for the job. Quick n Brite is non-toxic and biodegradable so it is safe for your pets and yourself. Since Quick n Brite is an all purpose cleaner it is also great to clean your pet cages or pet stains on carpets! See more Cleaning Tips using Quick n Brite.

64 oz. Liquid - Click Image to Close